
3 Design Tips for Your Community or Company Website
A website is an incredibly important asset to community management, helping to make operations smoother and bring the community together. As a leading community management solution, Pilera continues to strive toward enhancing our tools for managers. A product that we’ve made major enhancements to just recently is the community and company websites. These websites are mobile-friendly and integrate with various modules in Pilera. In this month’s Manager Toolkit, we’ll explore three design tips that you can implement for your website using Pilera’s websites.
Tip #1: Add Your Logo & Banner
In our community website templates, we’ve created a simple mechanism you can use to organize images that are part of your entire website. This mechanism is called a photo group. Logos and headers are examples of images that are omnipresent on your website.
Here’s how to get started with adding your logo and header:
- In the admin control panel, click on “Photo Gallery”.
- Click on Add Group – provide a name and description for the group. Then, select “Yes” in the Site Photo Group field.
- Click “Add a Photo to the Group” – provide a photo name, caption, description, and location. Then, tag your images exactly as per the following, to control how they will appear on the website: logo as “logo” and header as “banner”.
Watch Video: Add a Logo and Banner in Pilera
Tip #2: Create a Color Scheme
The colors you use for your website are essential to the brand and values it stands for. Thus, we’ve provided an enhanced color scheme consisting of primary and secondary colors, a choice of two background colors, and button color for your calls-to-action. For your community or company website administrators that would like a more intricate design, we’ve incorporated a custom styles section that they can enter their HTML code in. To create or update your color scheme, navigate to the Admin Control panel and click on “Change Site Look”.
Tip #3: Make Your Content Informative & Beautiful with Templates
Our new community website incorporates a variety of templates to help you create a beautiful design to house your content. These content templates incorporate a mix of images, captions, headers, paragraph text, and call-to-action links.
To access these content templates, you will first need to be in Admin Mode. Then, click on the “+” button on the website editor and select the “Content (Freeform HTML Blob)” option. The icon that’s the third to the left includes a wide variety of content template options:
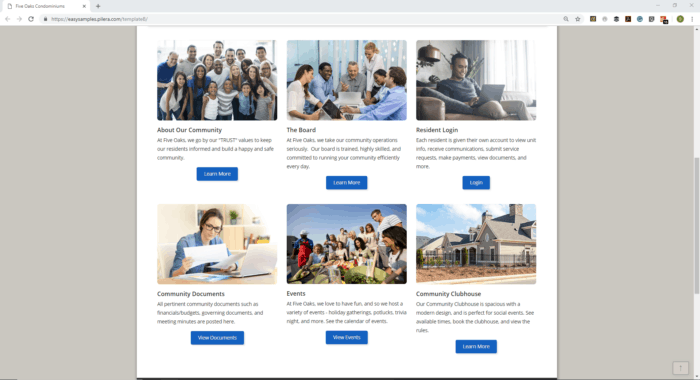
- Content Cards Row of 3 – A row of three content cards that comprise of images, header & paragraph text, and button. You can edit the images by simply right clicking on the image and then selecting the “Image Properties” option.
- Content Cards Row of 6 – Two rows of three content cards each that comprise of images, header & paragraph text, and button.
- Image on left or right with text wrap – Great for displaying associated image and text.
- Image as a Polaroid with caption – A Polaroid-style frame around an image with text wrap on the right or left side.
- 2 Column Content Block with Header – Great for publishing articles or news on your website.
With all other property management tasks, you and your staff are immersed with, updating information for your community or company should be simple, enjoyable, and less time-consuming. With our new community website templates, we’ve incorporated an organized way to display your content that will take you less time to maintain and also give a beautiful look and feel to your website.


